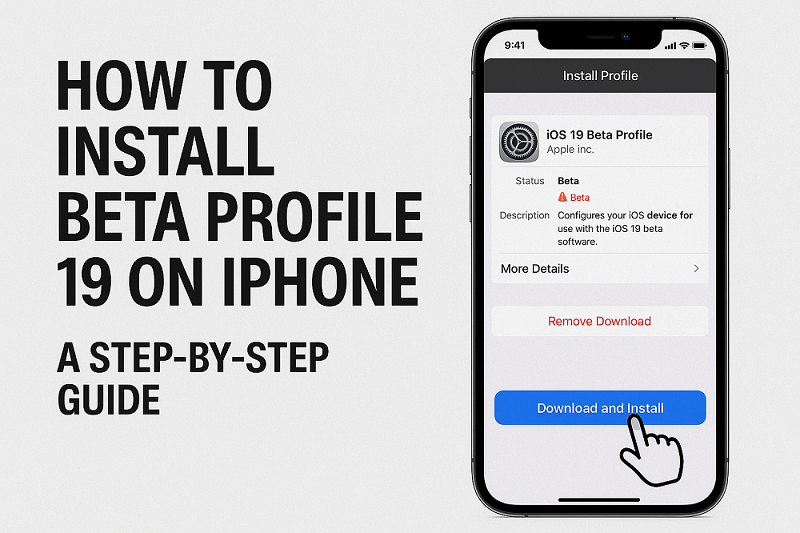
Manticore Jailbreak IPA Download Free for iOS

Manticore jailbreak

Manticore Jailbreak is one of the best and awesome tools for jail break for iPhone and iPad devices. We have provided the direct download link of Manticore Jailbreak for your iOS.

Manticore Jailbreak is open source jailbreak tool which helps your iOS devices for free from restrictions and rules. There are some tools which are providing these services, but this is one of the best and easy ways for jailbreak of your iPhone and iPad. We have listed some key features and Manticore ipa file below, let’s start read before going to downloading the ipa file.

Features of Manticore Jailbreak:

Free to download and free to use for jail breaking

Supported by the all type iOS devices having 14.0 and 14.3

No PC is required for this system

Most downloaded and used tool for jail breaking

Latest version is available for iPhone

No any issue with ipa file

Supported Devices:

iOS 14.3

iOS 14.2.1

iOS 14.2

iOS 14.1

iOS 14.0.1

iOS 14

iOS 15, iOS14.7.1, iOS 14.7, iOS 14.6, iOS 14.5.1, iOS 14.5, iOS 14.4.2, iOS 14.4.1, and iOS 14.4 not yet support for the Mantico jailbreak.

Device Compatibility:

A14

A13

A12

A11

A10

A9

A8 and below

iPhone 12, iPhone 12 Mini, iPhone 12 Pro, iPhone 12 Pro Max, iPhone 11, iPhone 11 Pro, iPhone 11 Pro Max, iPhone XS, iPhone XS Max, iPhone XR, iPhone X, iPhone 8, iPhone 8 Plus, iPhone 7, iPhone 7 Plus, iPhone 6s, iPhone 6s Plus, iPhone SE (1st & 2nd generation), iPod touch, iPad (5th,6th, 7th, 8th generation), iPad Pro (1st & 2nd generation), iPad Mini (5th generation), iPad Air (3rd & 4th generation)

IPhone 13 / A15 iPhone devices compatibility is not yet confirmed. But let’s hope that Manticore jailbreak will support all the devices including iPhone 13 (A15) jailbreaks too.


Conclusion

Manticore Jailbreak is best and easy way for jail breaking of apps and tool iPhone, and iPad. Therefore, you can download the Manticore jailbreak ipa for easy and fast jail breaking of iPhone. If you are facing any problem during using this application, then use comment box for getting help.

iOS Jailbreak Click Below Links:

Manticore JailBreak

Electra Jailbreak

Chimera Jailbreak

Odyssey Jailbreak

Taurine Jailbreak

Chyote Jailbreak

How to Use ChatGPT on Your iPhone: A Step-by-Step Guide

how to use chatgpt on iphone

Welcome to the future where your iPhone becomes a portal to an AI-powered companion – ChatGPT! In this blog post, we’re going to walk you through the process of using ChatGPT on your iPhone. It’s like having a conversation with a tech-savvy friend, and we’re here to guide you on this interactive journey.

chatgpt for iphone
chatgpt for iphone

Finding Your ChatGPT Buddy:

Imagine ChatGPT as your virtual buddy who’s always ready to chat. Head to the App Store, find the official ChatGPT app and hit that download button. Once installed, you’re just a tap away from unlocking a world of conversational possibilities.

Setting Up Your Buddy’s Profile:

Like any good friendship, creating a personal connection is key. Open the app, and let’s set up your buddy’s profile. A valid email, a unique password, and a friendly agreement to the terms – that’s all it takes to make it official.

Getting to Know Your Buddy’s Hangout:

Explore the app’s hangout spot – the interface. It’s designed to be user-friendly, like a cozy corner where you and your buddy can chat. Take a look around at options like “Chat,” “Settings,” and “History.” This is your playground; make it feel like home.

Starting the Conversation:

Now, let’s dive into the fun part – chatting with your buddy. Tap on “Chat” and start typing away. Ask questions, share stories, or even tell a joke. Your buddy, ChatGPT, will respond in a way that’s remarkably human-like, making your conversation engaging and enjoyable.

Asking Your Buddy to Do Cool Stuff:

ChatGPT is not just a talker; it’s a doer too! Try asking your buddy to do something cool, like translating a phrase into French or summarizing the latest news. Experiment with different prompts, and you’ll be surprised at what your buddy can pull off.

Checking Out Quick Tricks:

Your buddy might have some cool shortcuts or quick tricks up its sleeve. Look for commands like “/translate” or “/define” to see what nifty tasks your buddy can perform effortlessly. These shortcuts are like secret handshakes that unlock a world of possibilities.

Giving Your Buddy a High-Five (or a Reality Check):

Your buddy is smart, but it’s not perfect. Take a peek at the responses it generates and give it a high-five for being awesome. If something seems off, don’t hesitate to give it a gentle reality check by editing the response. It’s all part of the friendship – helping each other grow.

Saving the Best Chats:

Every good chat deserves to be remembered. Check out the “History” feature, where you can save your favorite conversations. It’s like creating a scrapbook of memories with your buddy. You never know when you might want to revisit a chat and relive those moments.

Keeping Up with the Gossip (Updates):

Just like any good friend, your buddy might get even better over time. Keep an eye out for updates to the app. Developers often sprinkle in new features, fix bugs, and make your buddy even more awesome. Stay in the loop and make sure you and your buddy are always on the same page.

chatgpt iphone
chatgpt iphone

Sharing Your Thoughts:

Friendship is a two-way street, and your buddy wants to hear from you. If you stumble upon something amazing or have a suggestion for improvement, don’t keep it to yourself. Share your thoughts with the developers through feedback. You might just be the reason your buddy becomes even more incredible.

Conclusion:

Congratulations! You’ve just made a new friend – ChatGPT on your iPhone. It’s not just an app; it’s a buddy ready to chat, entertain, and assist. With the right commands, a bit of editing, and a touch of personalization, you can turn your interactions into memorable conversations. So, grab your iPhone, open up ChatGPT, and let the friendship begin!

Sileo Download Free No jailbreak for iOS 2024

sileo package

Sileo is a third-party package manager for iOS devices. It allows users to download and install applications and tweaks on their jailbroken devices. It was developed as an alternative to the popular Cydia package manager, and is designed to be more user-friendly and modern. Sileo can be installed on jailbroken iOS devices running iOS 11 or later.

Features

As a package manager for jailbroken iOS devices, Sileo offers many features and benefits for users. Some of these features include:

A modern, user-friendly interface that makes it easy to browse and install packages

Support for multiple repositories, allowing users to access a wide range of applications and tweaks

The ability to search for packages using keywords or filters

A dedicated “Changes” tab that shows users what has been updated or added to their device

The ability to manage and customize installed packages, including the ability to enable or disable certain features

Integration with the payment service Patreon, allowing users to support their favorite developers

A built-in package updater that makes it easy to keep installed packages up-to-date

Overall, it offers a range of powerful features that make it a popular choice for users of jailbroken iOS devices.


sileo package manager
                                  sileo package manager

How to use Sileo Package Manager

To use Sileo on a jailbroken iOS device, follow these steps:

Install the package from a trusted repository on your jailbroken device.

Once installed, launch Sileo from the home screen or app drawer.

From the main menu, browse available packages or search for a specific package using keywords or filters.

When you find a package you want to install, tap on it to view more information and options.

Tap the “Install” button to begin the installation process.

It will download and install the package on your device. You may be asked to confirm certain actions or enter your password during the installation process.

Once the installation is complete, the package will be available on your device and you can use it as normal.


To manage or update installed packages, go to the “Sources” tab and tap on the “Manage” button next to the source that contains the packages you want to manage. From here, you can view a list of installed packages and manage them as needed. You can also use the built-in package updater to check for and install updates for your packages.

FAQ for Sileo Package Manager

Here are answers to some common questions about this tool:

Is Sileo free to use?

Yes, it is free to download and use.

Is Sileo safe to use?

This is considered safe to use on jailbroken iOS devices. However, as with any third-party software, it’s always a good idea to only download and install packages from trusted sources.

Does Sileo work on all iOS devices?

Yes it is compatible with all iOS devices running iOS 11 or later that have been jailbroken.

Can Sileo be used to install unauthorized or pirated packages?

This tool does not prevent users from installing unauthorized or pirated packages on their devices. However, we do not condone piracy and recommend only downloading and installing packages from trusted sources.

Can Sileo be used to remove Cydia from my device?

It can be used to remove Cydia from your device if you no longer want to use it. To do this, go to the “Manage” tab in Sileo, tap on the “Installed” button, and select Cydia from the list of installed packages. Then, tap the “Modify” button and choose the “Remove” option. This will remove Cydia from your device and free up space on your device.

Apple Pay, and How does it work on Amazon

How do I use Apple Pay?
With the fast development of innovation, internet shopping has turned into an indispensable piece of our day-to-day routines. From dress to hardware, the accommodation of perusing and buying items from the solace of your home has changed the retail scene. One of the most famous computerized installment techniques is Macintosh Pay, known for its convenience and security. In this blog entry, we will direct you through the straightforward moves toward using Apple Pay on Amazon with your iPhone, guaranteeing a consistent shopping experience.

Set up Apple Pay on Your iPhone

Before you can utilize this payment option for buys, you want to guarantee it is set up on your iPhone. Luckily, the interaction is direct: Stage 1: Send off the ‘Settings’ application on your iPhone. Stage 2: Look down and tap on ‘Wallet and Apple Pay.’ Stage 3: Snap ‘Add Card’ and adhere to the on-screen guidelines to add your credit or charge card to this payment system. Stage 4: Check your card with your bank utilizing the safety efforts given. When your cards are added to it, you are currently prepared to utilize this safe installment technique on Amazon.

Guarantee Your Amazon Application Supports Apple Pay

To utilize this payment on Amazon, you really want to guarantee that your Amazon application is refreshed and upholds this installment technique. The latest forms of the application incorporate Apple Pay support, yet it’s really smart to twofold check and update the application if essential. Stage 1: Open the Application Store on your iPhone. Stage 2: Go to the ‘Updates’ tab at the base right corner. Stage 3: Look at the rundown of applications to find the Amazon application. Assuming an update is accessible, tap the ‘Update’ button close to the application.

Pick Your Things and Add Them to the Truck

With Apple Pay currently set up on your iPhone and the Amazon application refreshed to the most recent rendition, you can begin shopping. Peruse Amazon’s immense assortment of items and add the things you wish to buy to your truck. When you have all that you really want, continue to the checkout cycle. Select Apple Pay as Your Installment Strategy Stage 1: Go to your Amazon shopping basket. Stage 2: Survey the things in your truck to guarantee everything is right. Stage 3: Tap on the ‘Continue to Checkout’ button. Stage 4: On the checkout page, you’ll track down different installment choices. Search for the Apple Pay button, generally situated at the first spot on the list. Stage 5: Tap the Apple Pay button to pick your favored installment strategy.

Affirm Your Buy with Face ID or Contact ID

At the point when you select payment as your installment strategy, your iPhone will provoke you to confirm the exchange utilizing either Face ID or Contact ID, contingent upon your gadget model. Stage 1: For Face ID clients, essentially look at your iPhone to confirm the buy. Stage 2: For Contact ID clients, put your finger on the home button to finish the verification interaction. Apple Pay adds an additional layer of safety, guaranteeing that no one but you can approve exchanges with your biometric information.

Survey and Submit Your Request

After you’ve validated the installment, Amazon will show a synopsis of your request for your last survey. Guarantee that everything is precise, including the transportation address and installment subtleties. Whenever you’ve confirmed all the data, click the ‘Put in your request’ button to finish the buy.

Get Affirmation and Conveyance Updates

Upon effective culmination of your buy, Amazon will furnish you with a request affirmation. Furthermore, you’ll get refreshes on your request’s status and delivery subtleties through warnings on your iPhone.

Benefits of Utilizing Apple Pay on Amazon

Improved Security: it utilizes vigorous security highlights, like tokenization and biometric verification, making it safer than conventional charge card installments. Consistent Checkout: With this, you can avoid the awkward course of entering MasterCard subtleties physically, making the checkout cycle much faster and more productive. No Card Subtleties Put away: it guarantees that your MasterCard subtleties are not put away on the gadget or Apple’s servers, further safeguarding your delicate data. Contactless Shopping: While utilizing this app in actual stores that acknowledge it, you can finish buys with only a tap, giving a helpful and safe contactless shopping experience.

Conclusion:

Embracing computerized installment strategies like Mac Pay on Amazon smoothest out your web based shopping experience as well as adds an additional layer of safety to safeguard your monetary data. By setting up Apple Pay on your iPhone, you can partake in a quick, secure, and bother free shopping experience on Amazon and other upheld stages. Express farewell to the problem of entering MasterCard subtleties, and express welcome to a consistent checkout process with Apple Pay! Cheerful shopping!

Frequently Asked Questions (FAQs) about Using Apple Pay on Amazon with Your iPhone

What is Apple Pay, and how does it work on Amazon?

Apple Pay is a digital payment service provided by Apple, allowing users to make secure and convenient purchases both in-store and online using their iPhones, iPads, Apple Watch, or Mac. On Amazon, Apple Pay serves as a payment option during the checkout process. Once you have set up Apple Pay on your iPhone and added your credit or debit cards, you can select Apple Pay as your payment method on Amazon and complete the purchase using Face ID or Touch ID for authentication.

Can I use Apple Pay on Amazon with any iPhone model?

Yes, you can use it on Amazon with any iPhone model that supports this feature. Apple Pay is available on iPhone models with Face ID (iPhone X and newer) and Touch ID (iPhone SE, iPhone 6S, and newer).

Is it secure for online purchases?

Yes, Apple Pay is one of the most secure digital payment methods available. It utilizes advanced security technologies, such as tokenization, which replaces your actual credit card number with a unique token, ensuring that your sensitive information is not shared during transactions. Additionally, Apple Pay requires biometric authentication (Face ID or Touch ID) to authorize payments, adding an extra layer of security.

Can I use Apple Pay for all items on Amazon?

Apple Pay is available as a payment option for eligible items on Amazon. Most products and sellers support it. but there might be some exceptions. During the checkout process, you can check if Apple Pay is available for your purchase.

Can I use Apple Pay on the Amazon website and the Amazon app?

Yes, you can use it on both the Amazon website and the Amazon app on your iPhone. Ensure that you have the latest version of the Amazon app installed to access the option during checkout.

Free Download Chimera Jailbreak for iOS 12

chimera jailbreak

Chimera Jailbreak is the way through which you can break the restrictions on iOS devices. Which helps iOS users to download any apps, games, themes, tweaked apps, and ++ apps for free.

There are many peoples who want to jailbreak for using many extensions on their iOS devices, but this is possible by using Chimera Jailbreak. So if you want to download Chimera for iPhone and iPad then you are right place, we have provided step by step process and Chimera IPA file for you.

Chimera Jailbreak Features:

This semi-untethered Jailbreak tool for best jail breaking

This tool is supported almost all iOS 12 running A12 Chip-powered devices.

Offers Sileo a Cydia Alternative Apps store

User Friendly and easy to use for jailbreak

No any hidden charges for using it

Jailbreak can be done within a single click.

Core-trust Bypass works much safer and avoids iPA resigning.

Fast and easy for installation

chimera jailbreak
chimera jailbreak

How to Install Chimera Jailbreak:

Step by Step Guide – computer method installing Chimera

Step 1: Download Chimera Jailbreak and Cydia Impactor

* Click on the Above Download Chimera ipa Button.

* Download Cydia Impactor from http://www.cydiaimpactor.com/ (official site)

Step 2: Install Chimera using Cydia Impactor

  1. Connect your iPhone or iPad to the computer with the Lightning cable.
  2. Launch Cydia Impactor. It will detect your iOS device.
  3. Drag and drop the chimera ipa you have downloaded or select “Devices” from the menu and then select “install packages”. Then select on the package you want to instal and click on ‘Open’.
  4. Enter the Apple ID and one time password for your Apple Developer account when prompted.
  1. Wait until the signed Chimera jailbreak app appears on the Device.

Step 3: Trust Developer profile

  1. Once Chimera jailbreak is successfully installed on your device.
  2. Open the Settings.
  3. Navigate to Settings > General > Profile(s) & Device Management.
  4. Click on the Chimera jailbreak profile.
  5. Click on Trust and confirm it.

Step 4: Run Chimera Jailbreak

  1. Open the Chimera Jailbreak app from the Home screen.
  2. Click Jailbreak button to start the jailbreak process.

Step 5: Completing Jailbreak Process

  1. Your device will be rebooting when jailbreak process has done.
  2. Type your passcode when it required.
  3. Once finished, open again the Chimera Jailbreak app, then the Chimera jailbreak app will confirm that you’re jailbroken.
  4. Congratulations!

How to Delete Chimera Jailbreak:

  • Uninstalling
  • Open the Chimera application
  • Enable Restore RootFS
  • Press Jailbreak
  • This may take some time
  • If it fails, try again from the beginning
  • When finished, tap OK and your device will restart

Chimera should now be uninstalled, leaving you safe to install any other jailbreak.

Supported Devices:

iOS versions :    iOS 12.5.5, iOS 12.5.4, iOS 12.5.3, iOS 12.5.2, iOS 12.5.1, iOS 12.5, iOS 12.4.9, iOS 12.4.8, iOS 12.4.7, iOS 12.4.6, iOS 12.4.5, iOS 12.4.4, iOS 12.4.3, iOS 12.4.2, iOS 12.4, iOS 12.3.2, iOS 12.3.1, iOS 12.3, iOS 12.2, iOS 12.1.4, iOS 12.1.3, iOS 12.1.2, iOS 12.1.1, iOS 12.1, iOS 12.0.1, iOS 12

Device models : iOS 12 – iOS 12.5.5 running iPhone X, iPhone 8, iPhone 8 Plus, iPhone 7, iPhone 7 Plus, iPhone 6s, iPhone 6s Plus, iPhone 6, iPhone 6 Plus, iPhone SE, iPhone 5s, iPad Air 2, iPad Air, iPad Pro (1st gen, 12.9”), iPad Pro (1st gen, 9.7”), iPad (5th gen), iPad Pro (2nd gen, 10.5”/12.9”), iPad (6th gen),iPad Pro (3rd, 11″/12.9″), iPad Air (3rd gen), iPad Mini (5th gen), iPad (7th gen), iPad mini 4, iPad mini 3, iPad mini 2, iPod 7th gen, iPod touch 6G

Frequently Asked Questions:

Q: What is chimera for iPhone?

A: This is jail breaking for iPhone and iPad devices.

Q: What is Chimera app?

A:  This is tool developed for jailbreaking of iOS mobiles.

Q: Can you Jailbreak iOS 14?

A: No its, for iOS 12.0 version operating system.

Q: Can iOS 12 be jailbroken?

A: Yes you can do it by using Chimra

Q: Is Chimera better than unc0ver?

A: Chimera is best

Q: Is Chimera land on iOS?

A: Yes

iOS Jailbreak Click Below Links:

Manticore JailBreak

Electra Jailbreak

Chimera Jailbreak

Odyssey Jailbreak

Taurine Jailbreak

Chyote Jailbreak

Transfer Sim Card to New iPhone 13, 14, 15

how to transfer sim card to new iphone
  1. Make sure you have a backup of your old iPhone. This is important because transferring your SIM card will not transfer any of your data, such as your contacts, photos, or apps. You can back up your iPhone to iCloud, iTunes, or a computer.

  2. Eject the SIM card from your old iPhone. To do this, use a SIM ejector tool or a paper clip to press the small hole next to the SIM tray. The tray will pop out.

    SIM ejector tool


    chevron_right
  3. Remove the SIM card from the tray. Be careful not to bend or damage the SIM card.

  4. Insert the SIM card into your new iPhone. The SIM card will only fit one way, so make sure you insert it correctly.

    SIM card inserted into iPhone
  5. Turn on your new iPhone. It may take a few minutes for the iPhone to activate.

  6. Set up your new iPhone. Follow the on-screen instructions to set up your iPhone, including entering your Apple ID and password.

  7. Check that your cellular service is working. Once your iPhone is set up, open the Settings app and tap on Cellular. Make sure that your carrier and plan are displayed correctly.

If you are having trouble transferring your SIM card, you can contact your carrier for assistance.

Here are some additional things to keep in mind when transferring a SIM card to a new iPhone:

  • Make sure that your new iPhone is compatible with your carrier’s network.
  • If you are moving from an older iPhone to a newer iPhone, you may need to update your SIM card. You can do this by contacting your carrier.
  • If you are using an eSIM, you will need to transfer your eSIM to your new iPhone. You can do this by contacting your carrier.

FAQ

Here are some frequently asked questions about transferring a SIM card to a new iPhone:

  • What if my new iPhone doesn’t have a SIM tray?

Some newer iPhones, like the iPhone 14, use an eSIM instead of a physical SIM card. An eSIM is a digital SIM card that’s embedded in your phone. To transfer your cellular plan to an eSIM, you’ll need to contact your carrier and they will be able to help you with the process.

  • What if my old SIM card is too big for my new iPhone?

If your old SIM card is too big for your new iPhone, you can either get a new SIM card from your carrier or you can trim your old SIM card to fit. To trim your old SIM card, you’ll need a SIM card cutter. Be sure to follow the instructions carefully to avoid damaging your SIM card.

  • What if I don’t have a SIM ejector tool?

If you don’t have a SIM ejector tool, you can use a paper clip instead. Simply straighten out the paper clip and insert it into the hole next to the SIM tray. Then, gently pry open the SIM tray.

  • What if I have problems transferring my SIM card?

If you’re having problems transferring your SIM card, contact your carrier for help. They should be able to troubleshoot the issue and help you get your phone up and running.

Apple Pay, and How does it work on Amazon

How to Download iOS 17 Beta Profile Latest Version

Call of Duty iPA Download for iOS, iPhone and iPad


iPhone 14 Release Date, Design, Price and Specification

iPhone 14 Price, Details, Specifications, Price, Colors, and Release Date:

iPhone 14 will be launched in Pakistan on September 14 2022. In this post you will get full specification of iPhone 14 Prices, Ram, and all details here. The new iPhone 14 comes with awesome features and much more new improvement, which will make the iOS user happy and much more.  Price of iPhone 14 is 1100$ and it is now available for iOS users. There are lots of reasons behind the iPhone that how much people love these devices. The Camera, Improved Battery, Display, and other changes will win your heart. Stabilization of camera is one the best feature for traveling vloggers, which will help them for making videos without any problem. Below we have listed some key features and details iPhone 14, let’s watch and check the new features of iPhone 14 colors, design, release date and much more.

How to Download and Install iOS 16 Beta Profile on iPhone

How to Download and Install iOS 16 Beta Profile on iPhone

Overview of Beta Software for iOS 16

As we know that, ios 16 Beta Software is now available on website and you can now easily download and install the Beta Profiles on your iPhone devices and upgrade it to latest version of iOS operating system. Every June Apple releases beta profile for iOS devices and now in this year Apple announces the next version iOS 16 with loaded with best and exciting features. You will see how to download and install beta profile iOS 16 on your iPhone devices. We have listed all step by step process of installation. You need to follow all step by step process to get latest version ios 16 versions on your iOS devices.

iOS 16 Release Date

There is lots of news about releasing date of iOS 16, but you can see that iOS 12 was released in 17 September 2018; iOS 13 in September 2019, iOS 14 in 16 September 2020, iOS 15 in 20 September 2021 and iOS 16 may be released in between 10 to 20 September 2022.

List of iOS 16 Beta Profile Supported Devices

Here is the list of devices which iOS 16 beta profile 2022 supports. You must have following devices to have succefull installation on your devices. Before going to download the software just have a look on the list of supported devices which are compatible with latest version of iOS.
  • iPhone 8.
  • iPhone 8 Plus.
  • iPhone X.
  • iPhone XS.
  • iPhone XS Max.
  • iPhone XR.
  • iPhone 11.
  • iPhone 11 Pro.
  • iPhone 11 Pro Max.
  • iPhone 12.
  • iPhone 12 Mini.
  • iPhone 12 Pro.
  • iPhone 12 Pro Max.
  • iPhone 13.
  • iPhone 13 Mini.
  • iPhone 13 Pro.
  • iPhone 13 Pro Max.
  • iPhone SE (second generation and later).

Key Features of iOS 16 Beta Profiles:

Battery Percentage

You can see the percentage bar in battery, through which you can check the exact battery percentage in numeric, which can be set from the battery section in the setting.

Edit and Unsent Messages on Beta 16

Same like Instagram and Whatsapp, there is unsent the message option is available same feature is added in this version of Apple OS you will be able to edit and send messages.

Share Digital Key Wallets

Share keys option is added in new version though which you can share your keys to smart lock with family and friends so they can take care of your plants

Pay Through iPhone

Your iPhone device will works as ATM card you just pay through Apple Pay system no any extra charges for using it just scan and pay

More Filters and Focus Mode

Adding different mods levels to give focus on how iPhone looks and feels like. You can adjust it by depending on your focus modes

Installation using the configuration profile

Download the configuration profile from the ios 16 Beta download page. On your device: Download the configuration profile directly onto your device and follow the installation instructions. On your Mac or PC: Save the file to your hard disk and email it to an account on your iPhone. Tap the configuration profile in Mail and follow the installation instructions. Connect your device to a power cord and connect to Wi-Fi. Tap Settings > General > Software Update. Tap “Download and Install iOS 16 Beta” To update now, tap Install. Or tap Later and choose Install Tonight or Remind Me Later. If you tap Install Tonight, connect your device to a power cord at night and your device will update automatically by morning. If prompted, enter your passcode.

Installation using the restore image

Download the beta software restore image for your device from the download page. Open the Finder on your Mac. Connect your device to your computer with the cable that came with your device. If you’re prompted for your device passcode or to Trust This Computer, follow the onscreen steps. If you forget your passcode, help is available. Select your device when it appears in the Finder sidebar. In the Summary panel, hold the Option key and click the “Check for Update” button. Select the beta software restore image and click open to start the installation. After installing the beta, your device will reboot and will require a network connection to complete activation. Make sure to enable Developer Mode on your device. This will let you grant permission to run locally-installed apps on these platforms — for example, when you perform a build-and-run in Xcode or install an .ipa file with Apple Configurator.

Conclusion

So these are step by step process for downloading and installing Beta Profile 16 version on your iPhone devices, if you have any problem while downloading Beta Profile 16 version on your iOS devices then you comment box below, our team will make video tutorial for How to Download and install Beta Profile iOS  16  BETA on iPhone devices.  Just follow the process above and get the latest version iOS on your iPhone and enjoy the features.

A Personal Guide to Sharing and Earning on Bigo Live with Your iPhone

bigo-live-iphone

Hey there, fellow iPhone enthusiasts and budding content creators! In a world where our smartphones are our constant companions, the possibilities for sharing our passions and making connections have never been more exciting. Enter Bigo Live, a vibrant platform that not only lets you showcase your talents but also offers a chance to earn while doing what you love. Let’s embark on a journey together as we explore the ins and outs of using Bigo Live on your iPhone and turning your hobbies into a rewarding experience.

Step 1: Dive into the World of Bigo Live

First things first – head to the App Store on your iPhone and grab the Bigo Live app. Tap that download button and let the adventure begin. Once installed, open the app, and you can choose to sign up through Facebook, Google, or your trusty phone number.

Step 2: Your Profile – It’s Your Story

Your profile is your digital canvas, and it’s time to paint it with colors that represent you. Pick a username that resonates with your personality and upload a profile picture that speaks volumes. Craft a bio that captures your essence, sharing a snippet of who you are and what makes you tick.

Step 3: Navigate the Bigo Live Universe

Bigo Live’s interface is like your backstage pass to the virtual world. Take a stroll through the menus, explore the features, and get comfortable with the app’s layout. The more you familiarize yourself, the more confidently you can take center stage.

Step 4: Lights, Camera, Action – Go Live!

Now, let’s kick things up a notch. Hit that “Go Live” button and let the world see your magic unfold. Plan your content, interact with your audience, and make it a party! Respond to comments, share stories, and create an atmosphere that invites everyone to join in.

Step 5: Gifts, Beans, and Turning Passion into Beans

Bigo Live has a unique way of showing appreciation – virtual gifts. Viewers can use beans, the app’s currency, to send you virtual gifts during your live sessions. The more gifts you receive, the more beans you accumulate. And guess what? You can convert those beans into real money.

Step 6: Shout It from the Digital Rooftops

Spread the word beyond Bigo Live by promoting your broadcasts on other social media platforms. Share your schedule, tease upcoming events, and use hashtags to connect with a wider audience. Your stage is set – let the world know about it!

Step 7: Consistency is the Secret Sauce

Building your audience takes time and consistency. Establish a regular broadcasting schedule to keep your newfound community engaged. Respond to messages, address your viewers by name, and let them feel like they’re a part of something special.

Conclusion:

Bigo Live isn’t just an app; it’s your digital playground. With your iPhone as your trusty sidekick, you have the power to share your passion, connect with people around the world, and even earn a little something in the process. So, unlock your creativity, hit that “Go Live” button, and let Bigo Live be the stage where your passion meets its audience!

How to Play Roblox Unblocked with/without VPN at School

Roblox Unblock at School

roblox
roblox

If you’re a fan of Roblox and looking to play it at school, you may face a common obstacle: network restrictions. Many schools and institutions block access to gaming websites, including Roblox, to ensure students stay focused on their studies. But for avid gamers, these restrictions can be frustrating. The good news? There are ways to play Roblox unblocked at school, with and without a VPN.

This comprehensive guide will cover all the methods you can use to access Roblox at school, highlighting each method’s pros and cons. By the end, you’ll know how to enjoy your favorite game during school breaks responsibly!


Table of Contents

  1. Understanding Why Roblox is Blocked at School
  2. Safety and Legal Concerns of Playing Roblox at School
  3. How to Play Roblox Unblocked with a VPN
    • What is a VPN?
    • Best VPNs for Playing Roblox
    • Step-by-Step Guide: Playing Roblox with a VPN
  4. How to Play Roblox Unblocked Without a VPN
      1. Use Proxy Websites
      1. Accessing through Browser Extensions
      1. Remote Desktop Applications
      1. DNS Servers
  5. Pros and Cons of Each Method
  6. Alternative Games Similar to Roblox for School
  7. Responsible Gaming: Balancing Studies and Fun

1. Understanding Why Roblox is Blocked at School

Schools typically block access to websites like Roblox to limit distractions. Gaming, especially multiplayer platforms like Roblox, can divert attention from academic tasks. By blocking such sites, schools hope to promote a focused learning environment. However, these restrictions can also impact students’ downtime, as they may wish to unwind with a game during breaks.

While it’s essential to respect school policies, there are legitimate ways to access blocked games responsibly, especially if you’re using your personal device or are on a break.


2. Safety and Legal Concerns of Playing Roblox at School

Before attempting to bypass any restrictions, be aware of the rules. If your school has a strict policy against unblocking sites, violating it could lead to consequences, including disciplinary action or restricted access to the school’s Wi-Fi.

Also, while VPNs and other methods can protect your data privacy, some tools (especially free ones) may expose you to security risks. It’s essential to ensure any method you use is safe and does not compromise your personal information.


3. How to Play Roblox Unblocked with a VPN

One of the most popular ways to access restricted sites is by using a Virtual Private Network (VPN).

What is a VPN?

A VPN creates a secure connection by routing your internet traffic through a private server, masking your IP address and making it appear as if you’re browsing from a different location. This process helps bypass network restrictions since the school network cannot see your online activity.

Best VPNs for Playing Roblox

Here are some reliable VPNs that work well with Roblox:

  • ExpressVPN: Known for its high-speed servers and robust security, ExpressVPN is a top choice for gamers.
  • NordVPN: Offers a vast range of servers and excellent privacy features.
  • CyberGhost: A user-friendly VPN with optimized servers for streaming and gaming.
  • Surfshark: An affordable option with no device limits and reliable speeds.
  • ProtonVPN: Has a free version with decent security features, although it might be slower for gaming.

Step-by-Step Guide: Playing Roblox with a VPN

  1. Download and Install a VPN: Choose a reputable VPN from the list above and install it on your device.
  2. Connect to a Server: Open the VPN app, sign in, and connect to a server outside your school’s region.
  3. Access Roblox: Once connected, open Roblox, and you should be able to play without restrictions.
  4. Maintain Security: Ensure the VPN is active throughout your session to prevent interruptions.

Pros: Reliable access, high security, masks IP address.

Cons: VPNs can slow down your connection slightly, and some are paid services.


4. How to Play Roblox Unblocked Without a VPN

If you’re unable to use a VPN or prefer not to, there are alternative methods to try.

1. Use Proxy Websites

Proxy websites work by acting as an intermediary between you and the game server, hiding your IP address in the process. Some popular proxy websites include Hidester, KProxy, and HMA.

Steps:

  1. Go to a trusted proxy website.
  2. Enter the Roblox website URL.
  3. Click “Go” or “Connect,” and the proxy will open Roblox for you.

Pros: Simple to use, no installation required.

Cons: Proxy websites can be slow, and not all are reliable. Be cautious with security, as some proxies may be unsafe.

2. Accessing Through Browser Extensions

Some browser extensions can help bypass network restrictions by creating an encrypted connection for your browsing activities.

Recommended Extensions:

  • Hola Free VPN: Allows you to browse from different countries.
  • Browsec VPN: Provides secure browsing options.
  • ZenMate: Offers both free and premium plans and easy-to-use controls.

Steps:

  1. Search for the extension on your browser’s extension store.
  2. Add it to your browser and activate it.
  3. Navigate to the Roblox website, which should now be accessible.

Pros: Convenient, doesn’t require a separate VPN application.

Cons: Limited to browser access, potentially slower performance.

3. Remote Desktop Applications

With remote desktop applications, you can access your home computer from school. This method essentially allows you to control your home PC from your school device, bypassing local network restrictions.

Popular Remote Desktop Applications:

  • TeamViewer
  • Chrome Remote Desktop
  • AnyDesk

Steps:

  1. Install a remote desktop app on both your home PC and school device.
  2. Log into your home computer from school using the app.
  3. Open Roblox on your home computer, which you’ll control remotely.

Pros: Reliable, access to all home PC files and applications.

Cons: Requires installation on both devices, relies on home PC being on.

4. DNS Servers

Sometimes, changing your DNS server can help bypass restrictions, as it routes your internet traffic differently. Public DNS servers like Google DNS or Cloudflare DNS may offer better access.

Steps:

  1. Go to your device’s network settings.
  2. Find the DNS settings and change them to:
    • Google DNS: 8.8.8.8 and 8.8.4.4
    • Cloudflare DNS: 1.1.1.1 and 1.0.0.1
  3. Restart your browser and try accessing Roblox.

Pros: Quick to set up, no external apps required.

Cons: DNS changes don’t always bypass restrictions, might not work in all cases.


5. Pros and Cons of Each Method

MethodProsCons
VPNHigh security, reliable accessMight require payment, possible speed loss
Proxy WebsitesEasy to use, no installationSlower, can be risky if unsafe proxy used
Browser ExtensionsConvenient, easy to enable/disableLimited access, slower speed
Remote DesktopFull access to home PC, effective workaroundRequires home PC setup
DNS ServersQuick, no extra appsNot always effective

6. Alternative Games Similar to Roblox for School

If none of the methods above work, here are some Roblox-like games that may not be blocked and could serve as substitutes:

  • Minecraft Education Edition: A great sandbox game allowed by many schools.
  • Lego Worlds: Similar to Roblox with building elements, but offline play.
  • Terraria: A fun, pixel-art sandbox game with crafting and exploration.

7. Responsible Gaming: Balancing Studies and Fun

While it can be tempting to play Roblox at school, it’s essential to use these methods responsibly. Make sure to balance your gaming time with your academic commitments, and prioritize studies during school hours. Here are a few tips for responsible gaming:

  • Play Only During Breaks: Avoid playing during class or study periods.
  • Respect School Policies: If gaming is strictly prohibited, wait until you’re off-campus.
  • Limit Gaming Time: Avoid lengthy gaming sessions to keep a healthy balance.

Conclusion

Playing Roblox unblocked at school is possible with the right tools and methods. Whether you use a VPN, a proxy, or an alternative game, remember to game responsibly and prioritize your education. By following the tips and methods outlined above, you can enjoy a bit of gaming during your free time without compromising your studies. Happy gaming!